- 구월 21, 2020
- 게시자: 외환 위키 팀
- 범주: 무료 외환 EA
안녕하세요 외환 위키 친구,
골든 스파이크 EA 설명 :
Golden Spikes EA는 외국 전문가의 거래 전략에 따라 만들어졌습니다.. 주요 차이점은 코드의 모든 매개변수를 최대한 정확하게 사용자 정의할 수 있다는 점입니다.. 전문가 고문은 다음을 사용합니다. 2 거래를 위한 독립 시스템.
The code itself is quite complicated, there are many settings, my work on it took about a month. For all conditions for entry and forced exit, labels have been added to the chart to make it easier to understand why the corresponding order was opened and closed. My library of news indicators has been added to the advisor, which will not allow entering the market if there is news. All default settings have not been optimized. I recommend testing and optimizing each system in turn.
Recommended currency pairs: HAUUSD
기간: M15
거래시간: 24시간 내내, at the time specified in the settings
Recommended MM: 0.01 많은 $ 300, 1-2% risk per trade.
브로커는 수수료가 낮아야 합니다., 낮은 스왑, 또한 빠른 서버. Trader EA는 모든 중개인 및 모든 유형의 계정과 함께 작동합니다., 그러나 고객이 다음 중 하나를 사용하는 것이 좋습니다. 최고의 중개인 상장 아래에:
최고의 브로커 목록 :
Description of the strategy: Although it is written in the settings that there are two systems, each system also has several independent conditions for entry and exit (for more details, see the description of the operation of the system).
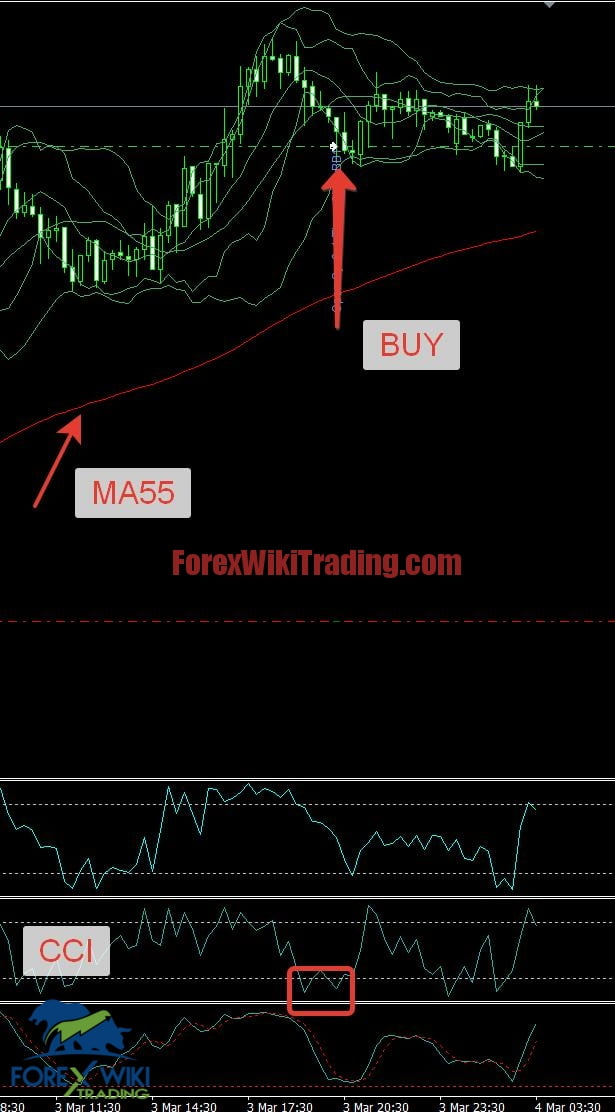
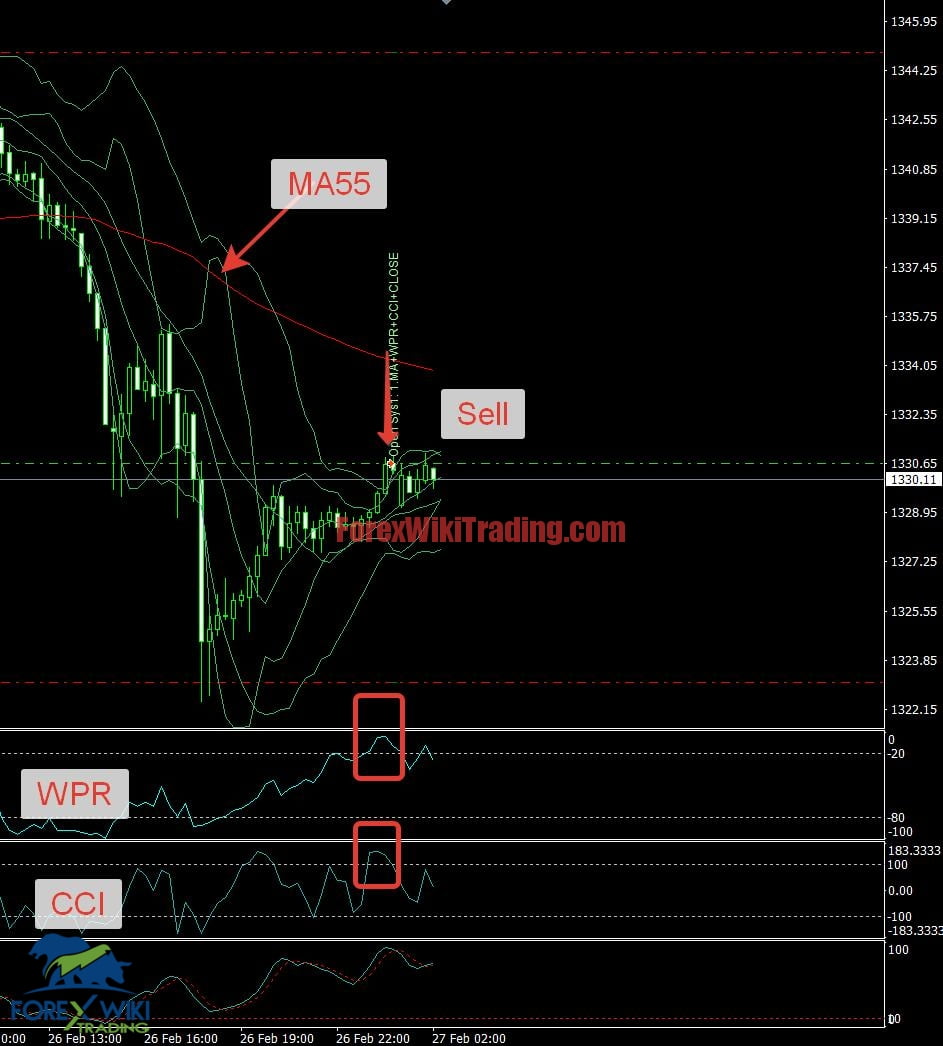
- The first system uses the indicators: 이동 평균, WPR, CCI, the closing price [1] of the candle at the current TF and M1. Trades in both directions has 2 conditions for opening and closing orders.
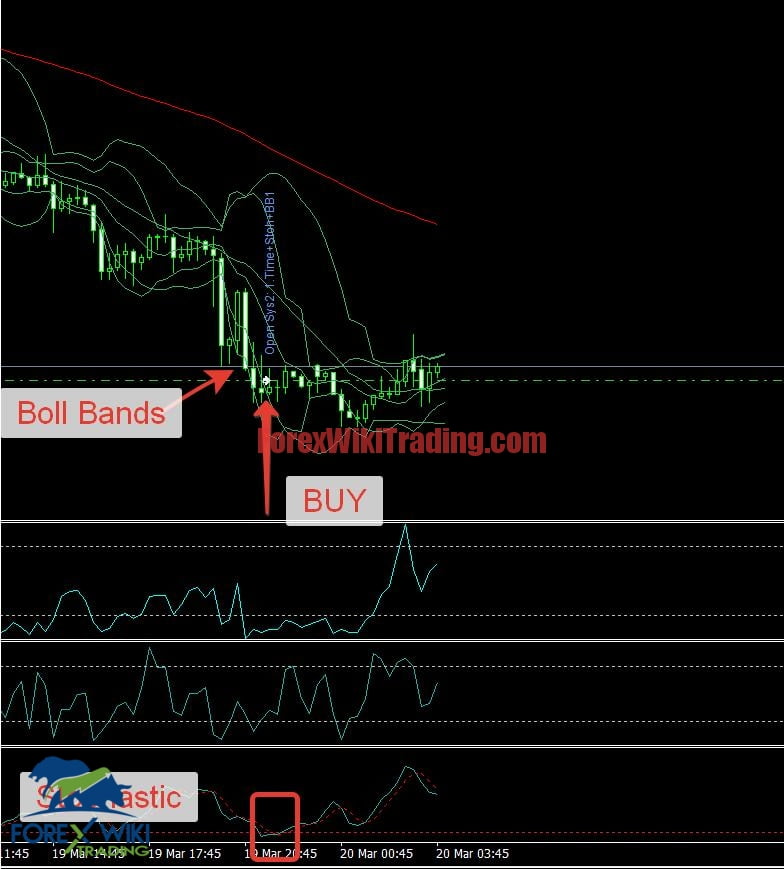
- The second system uses indicators: Bollinger bands, 확률적, start and end times for opening/closing orders. It trades only purchases, has 3 conditions for opening and closing orders.
The strategy at the heart of the advisor
이 리뷰에서, I will try to describe the general principles of the 자동 거래 시스템 strategies of the Golden Spikes EA.
More precisely, with all the parameters of the indicators, in the "프로그램 작성" language, the system is described in a thread on the forum.
And here my task ~이다 to convey the essence so that you have an understanding of why the Golden Spikes EA enters the market.
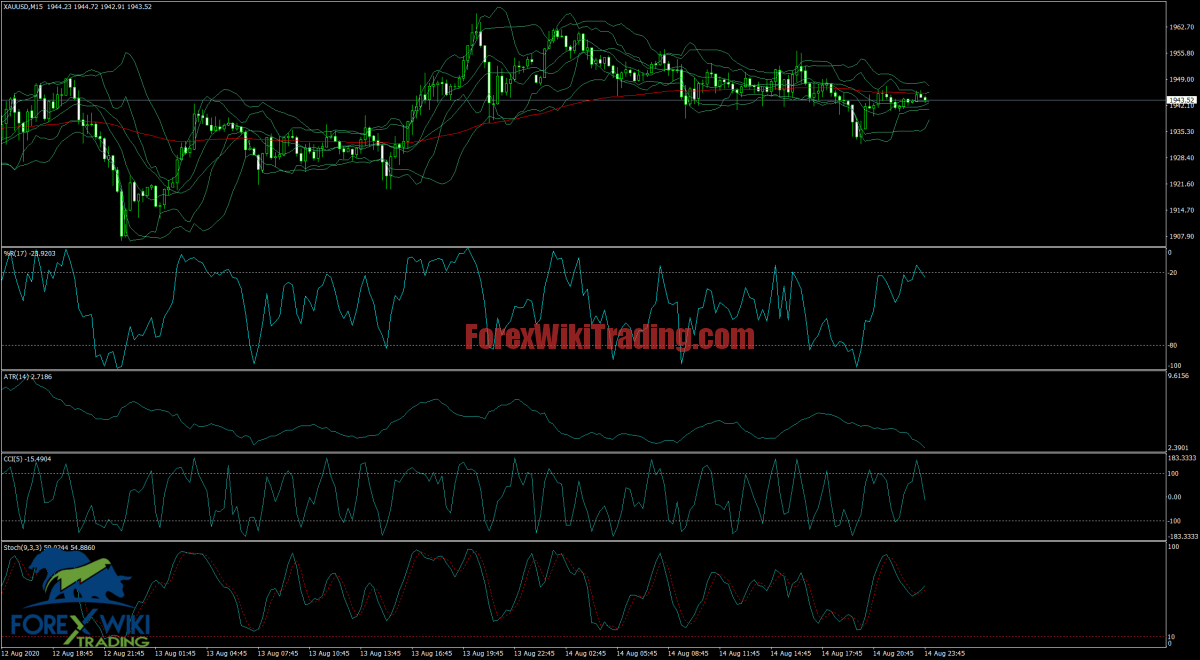
This is how the full set of indicators used by the EA looks like:
이동 평균, multiple sets of Bollinger Bands, ATR, 확률적, WPR and CCI.
Both EA strategies use ATR as a filter volatility (see the description of the settings below). If the ATR is below the values specified in the settings, orders are not opened. I.e if the market is calm, 평평한 - Advisor does not open warrant.
다음, we will consider the conditions for each strategy separately.
전략 1
거래 전략 2
The Golden Spikes EA only opens buy orders.
로그인 (at least one of three conditions must be met):
1) Stochastic is in the oversold zone (below level 10), the price is above the lower Bollinger Bands channel, and the specific trading time from the settings is observed;
2) The closing price of the candle at H1 is higher than the Low price of this candle, and the specific trading time from the settings is also observed;
3) The price is higher than the lower Bollinger Bands channel, the specific trading time from the settings is observed.
Example of entering purchases:
You can also enable the ability to open additional orders if the price goes negative.
Position tracking:
At the time specified in the settings, a trailing stop is activated to follow orders when the price passes the specified distance.
Exit a position (at least one of five conditions):
1) The specified time has come;
2) The price has passed the specified distance, the exit time coincides with the time from the settings;
3) The price has passed the specified distance, the last closed candlestick is bearish;
4) The price has passed the specified distance plus from the breakeven level;
5) Exit on Friday evening according to the time filter.
골든 스파이크 EA 설정:
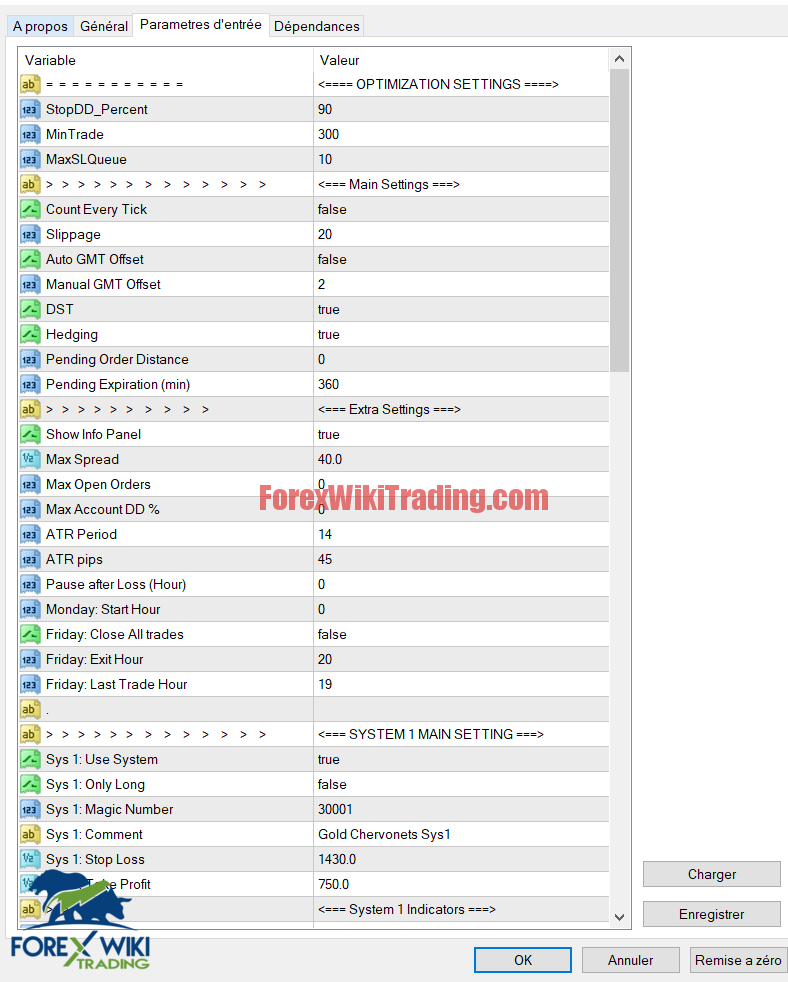
<=== Main Settings ===>
Count Every Tick - use every tick when trading; 만약에 거짓 , then the signal search will be performed 1 time per minute;
미끄러짐 - maximum allowable slippage in points;
Auto GMT Offset - automatically calculate the broker's GMT;
Manual GMT Offset - manually specifying the broker's GMT value;
DST - to be used if your broker is switching to summer / winter time;
헤징 - allow opening hedging (opposite) 명령;
Pending Order Distance - if it is not equal to 0 (영), then pending orders will be placed instead of market ones with the specified indent in points. If the value is negative, Stop orders are placed, if the value is positive, Limit orders are placed. This is not a pending switch, but a parameter for specifying the values of the order offset in points;
Pending Expiration (분) - pending order life time in minutes, after which it will be deleted if not activated.
<=== Extra Settings ===>
정보 패널 표시 - display the info panel 차트에서;
최대 스프레드 - 그만큼 maximum allowable spread for opening orders.
Max Open Orders - 그만큼 maximum allowed number of open orders for both systems in total. 만약에 0 - 그만큼 filter is disabled;
Max Account DD% - maximum account drawdown by equity, above which new orders will not be opened;
ATR 기간 - period of the Average True Range indicator for calculating volatility;
ATR pips - value of the ATR indicator in points, below which the volatility is considered weak and new orders will not be opened;
Pause after Loss (시간) - pause after a losing order in hours, during which no new orders will be opened;
월요일: Start Hour - time from which trading starts on Monday;
금요일: Close All trades - filter for closing orders on Friday after 금요일: Exit Hour , if the order lifetime is more than 3 분;
금요일: Exit Hour - time in hours, above which all orders will be closed on Friday, 만약에 금요일: Close All trades = true ;
금요일: Last Trade Hour - 그만큼 hour after which it is prohibited to open new orders on Friday. 만약에 -1 ~이다 not taken into account.
<=== SYSTEM 1 MAIN SETTING ===>
Sys 1: Use System - whether or not to use system # 1;
Sys 1: Only Long - allow opening only purchases for system # 1;
Sys 1: 매직넘버 - magic number for system # 1;
Sys 1: 손절매 - stop loss in points for system # 1;
Sys 1: 이익실현 - take profit in points for system # 1;
<=== System 1 Indicators ===>
Sys 1: iMA Period - period of the Moving Average indicator;
Sys 1: WPR Period - period of the Williams Percent Range indicator;
Sys 1: CCI Period - period of the Commodity Channel Index indicator;
Sys 1: iMA Shift 1 - offset from the MA for the first entry condition by the system;
Sys 1: iMA Shift 2 - offset from the MA for the second entry condition by the system;
Sys 1: WPR Level 1 - WPR level, ~ 위에 / below which the signal for the first entry condition on the system will be taken into account. For the lower level, the value -100- is taken Sys 1: WPR Level 1;
Sys 1: WPR Level 2 - WPR level, ~ 위에 / below which the signal for the second input condition on the system will be taken into account. For the lower level, the value -100- is taken Sys 1: WPR Level 2 ;
Sys 1: CCI Level - CCI level, ~ 위에 / below which the signal for the first entry condition on the system will be taken into account. For the opposite level, the value is taken - Sys 1: CCI Level ;
Sys 1: iClose Shift - offset from the bar's close [1] 가격, required to open an order;
<=== System 1 Modify & Closing ===>
Sys 1: Trail SL Pips Start - value in points after which Sl will be moved closer to the price;
Sys 1: Trail SL Pips Distance - distance from the order open price to the new Sl;
Sys 1: WPR Level Close - value of the WPR indicator, ~ 위에 / below which the signal for the first condition for exiting a trade will be taken into account;
Sys 1: iClose Shift Close - shift in points from the closing price [1] of the bar, which is required for the first condition to exit the deal;
Sys 1: Close Pips Distance 1 - 그만큼 distance in points from the current price to the open price, above which the order cannot be closed by the first condition for exiting the transaction;
Sys 1: Close Pips Distance 2 - 그만큼 distance in points from the current price to the open price, above which the order cannot be closed by the second condition for exiting the transaction;
Sys 1: Close Candle M1 Shift - offset from the close [1] price in relation to the open [1] price and for M1 TF to close by the second condition for exiting the trade.
<=== System 1 Risk Management ===>
Sys 1: 복구 모드 - recovery mod. 만약 사실이라면, after losing trades, the trading lot will increase to recover losses;
Sys 1: 고정 부지 - fixed lot that will be used if Sys 1: AutoMM = false ;
Sys 1: 자동MM - automatic money management, the trading lot will be calculated depending on the balance and Sys 1: 손절매 . With a value of 1, there will be a risk of 1% 예금의, 값으로 2 - 2%, 등등.
<=== SYSTEM 2 MAIN SETTING ===>
Sys 2: Use System - whether or not to use system # 2;
Sys 2: 매직넘버 - magic number for system # 2;
Sys 2: 손절매 - stop loss in points for system # 2;
Sys 2: 이익실현 - take profit in points for system # 2;
Sys 2: Max Open Orders - maximum number of orders for system # 2. 만약에 0 (영) - additional averaging orders will not be opened;
Sys 2: Distance Between Orders - minimum distance between orders of system # 2.
<=== System 2 Indicators ===>
Sys 2: Stochastic K Period - period K of the Stochastic indicator;
Sys 2: Stochastic D Period - D period of the Stochastic indicator;
Sys 2: Stochastic Slowing - period of the slowing down Stochastic indicator;
Sys 2: Stochastic Lower Level - 그만큼 lower level of the Stochastic indicator, below which a buy entry signal will be taken into account;
Sys 2: BB Period 1 - period of the Bollinger Bands indicator for the first condition for opening orders;
Sys 2: BB Period 3 - period of the Bollinger Bands indicator for the third condition for opening orders;
Sys 2: BB Deviation - deviation value of both Bollinger Bands indicators;
Sys 2: BB Channel Shift (핍) - offset from the BB channel for the first condition for opening orders;
Sys 2: BB Channel Shift 3 (핍) - offset from the BB channel for the third condition for opening orders.
<=== System 2 Opening ===>
Sys 2: Open Hour Start 1,2 - time in hours to start searching for a signal according to conditions 1 그리고 2 for opening orders;
Sys 2: Open Hour End 1,2 - time in hours of the end of the signal search under conditions 1 그리고 2 for opening orders;
Sys 2: Open Hour Start 3 - time in hours to start searching for a signal by condition 3 of opening orders;
Sys 2: Open Hour End 3 - time in hours of the end of the signal search by condition 3 of opening orders;
Sys 2: Modify Hour Equal - specific time in hours for modifying the SL using the Sys 2 매개변수 : Trail SL Pips ;
Sys 2: Open Pips Low Shift - 그만큼 distance in points added to the Low [1] price of the bar so that the resulting value does not exceed the Close [1] price of the bar for condition 2 입장을 위해;
Sys 2: Trail SL Pips - transferring SL orders for a specified distance at a specified time, if the new price is higher than the old SL.
<=== System 2 Closing ===>
Sys 2: Close Hour Equal 1 - exact time in hours when orders will be closed by condition 1. At -1, the filter does not work;
Sys 2: Close Hour Start 2 - start time of the search for a signal to close by condition 2 몇 시간 안에;
Sys 2: Close Hour End 2 - time of the end of the search for a signal to close by condition 2 몇 시간 안에;
Sys 2: Close Pips Distance 2 - 그만큼 distance from the bid price to the order opening price to close the order by condition 2;
Sys 2: Close Pips Distance 3 - 그만큼 distance from the bid price to the order opening price to close the order on condition 3;
Sys 2: Close Pips Distance BE - distance from the BU level, above which the order / group of orders will be closed.
<=== System 2 Risk Management ===>
Sys 2: 복구 모드 - recovery mod. 만약 사실이라면, after losing trades, the trading lot will increase to recover losses;
Sys 2: 고정 부지 - fixed lot that will be used if Sys 2: AutoMM = false ;
Sys 2: 자동MM - automatic money management, the trading lot will be calculated depending on the balance and Sys 2: 손절매 . With a value of 1, there will be a risk of 1% 예금의, 값으로 2 - 2%, 등등;
Sys 2: Lot Multiplier - multiplier for the trading lot that will be applied to the second and subsequent orders.
<===== NEWS FILTER ========>
UseNewsFilter - whether or not to use the news indicator;
Stop Trade Before News (분) - stop trading before the specified time of news release in minutes;
Start Trade After News (분) - start trading after the specified time of news release in minutes;
GMT 오프셋 - the time shift of the news according to GMT (예를 들어, for GMT Offset = +2 in winter and +3 in summer);
News Time Count - 그만큼 number of displayed news that do not have the same release time. Must be greater than 0 (영);
Show Table - displaying a table with data: 없음, left-top, right-top, left-bottom, right-bottom;
Table Time - display of news time in the table: before the news or the time of the news itself (by broker or local computer);
Show Forecast - display the previous values of news indicators and forecast for each news in the table;
Show Event Flags - show news flags or flags with permanent vertical lines describing the news;
Show Flags Text - display an inscription with news on the flag lines, 만약 사실이라면;
Show History Flags - saves flags with descriptions of past news on the chart.
<===== Currency Settings =====>
DoNotTradeNews - do not display the listed news (예를 들어, PMI, CPI, Retail Sales, Trade Balance, 등.);
Show Only Pair News - show news only for the current pair;
NewsImpact - 그만큼 importance of the news displayed.
<===== Notification Settings (분) =====>
Show Caution BeforeNews - show a notification of important upcoming news at the top of the screen in minutes before the release.
<====== Design Settings ======>
Color Header - setting the color of the news heading;
Color Low News - setting the color of news with low importance;
Color Medium News - setting the color of news with moderate importance;
Color High News - setting the color of high priority news.
All distance and target settings are indicated in the old paragraphs (2 decimal places).
If you do not understand what you are doing, then do not touch anything except the risk settings!
It is recommended to use lot 0.01 모든 $ 300 예금의, or put automatic money management 1-2%.
Golden Spikes EA Results:
History tests
Tests on history, 물론, do not reflect how the EA will behave in the future, but at least they can give a rough idea.
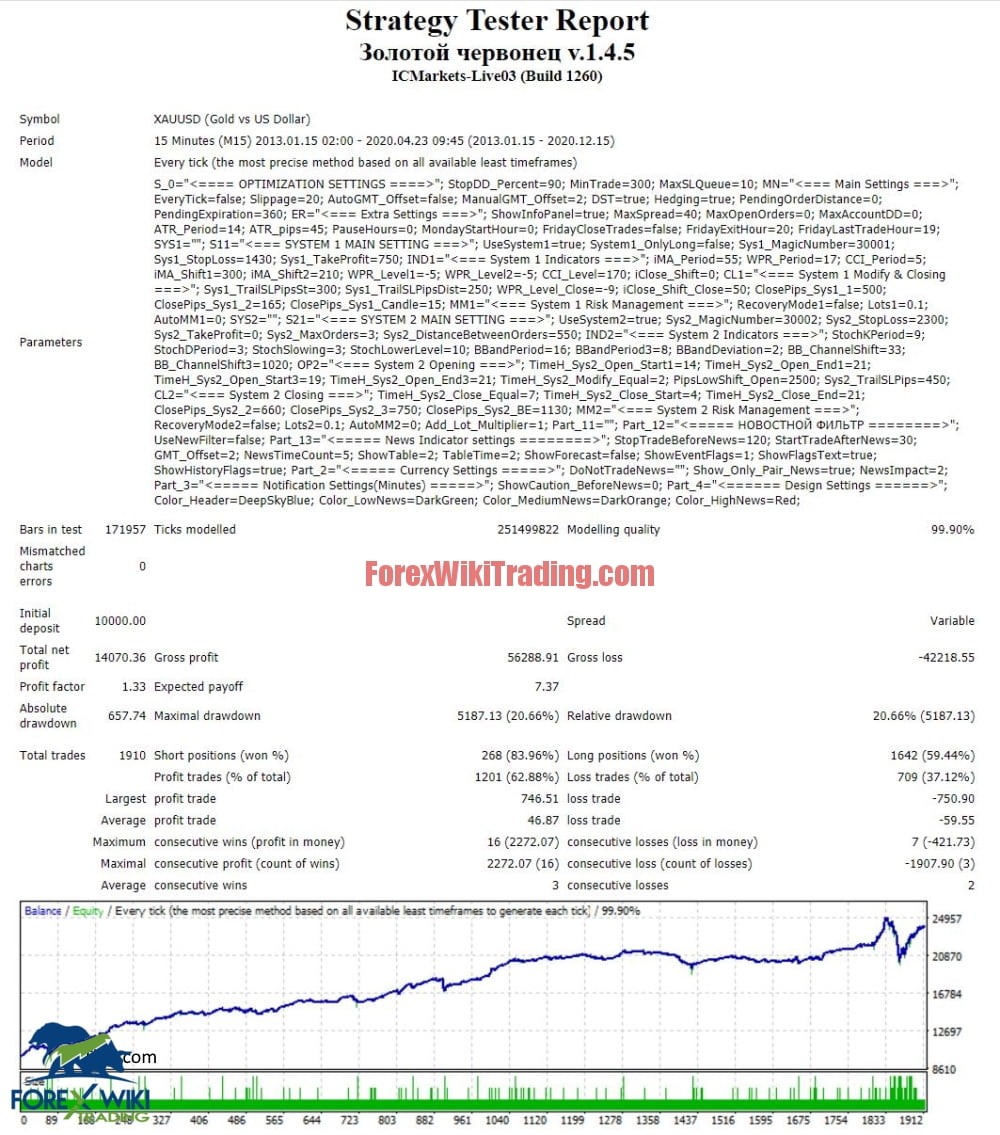
Let me remind you that we are doing tests with a fixed lot of 0.1 for a more adequate understanding of the EA's behavior and the size of the drawdown, as well as regular tests with activated money management.
For Golden Spikes EA using two strategies, we also made separate tests for each one. And additional tests with the recovery mode, when the advisor increases the lot after losing trades (권장하지 않음).
The tests below were done in the Tick Data Suite program with a simulation quality of 99%.
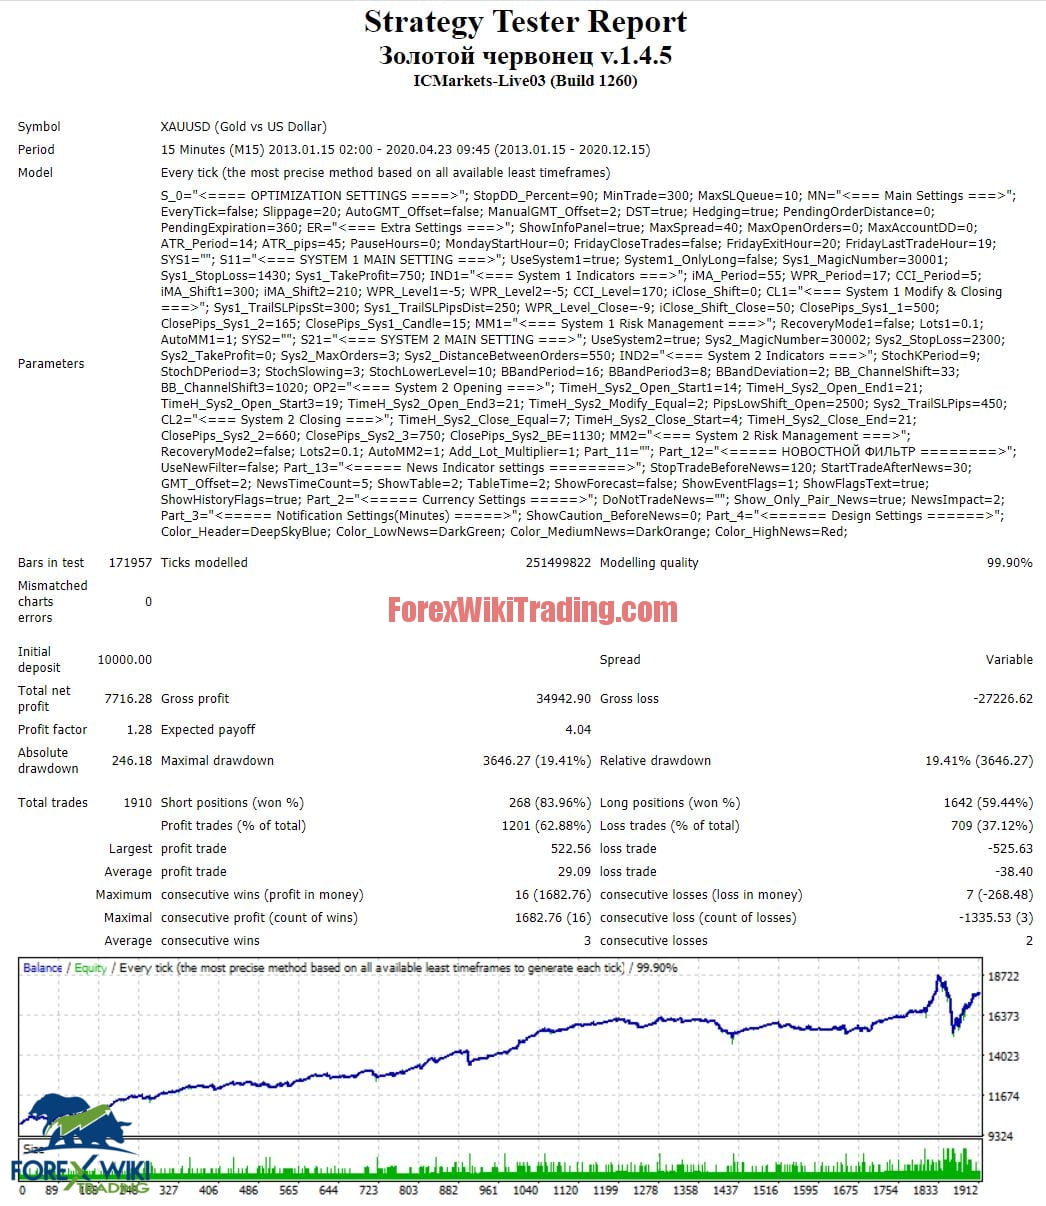
Test with activated money management, 1% risk per trade, 2013-2020
The tests are good, the drawdown does not exceed 20% with the MM activated.
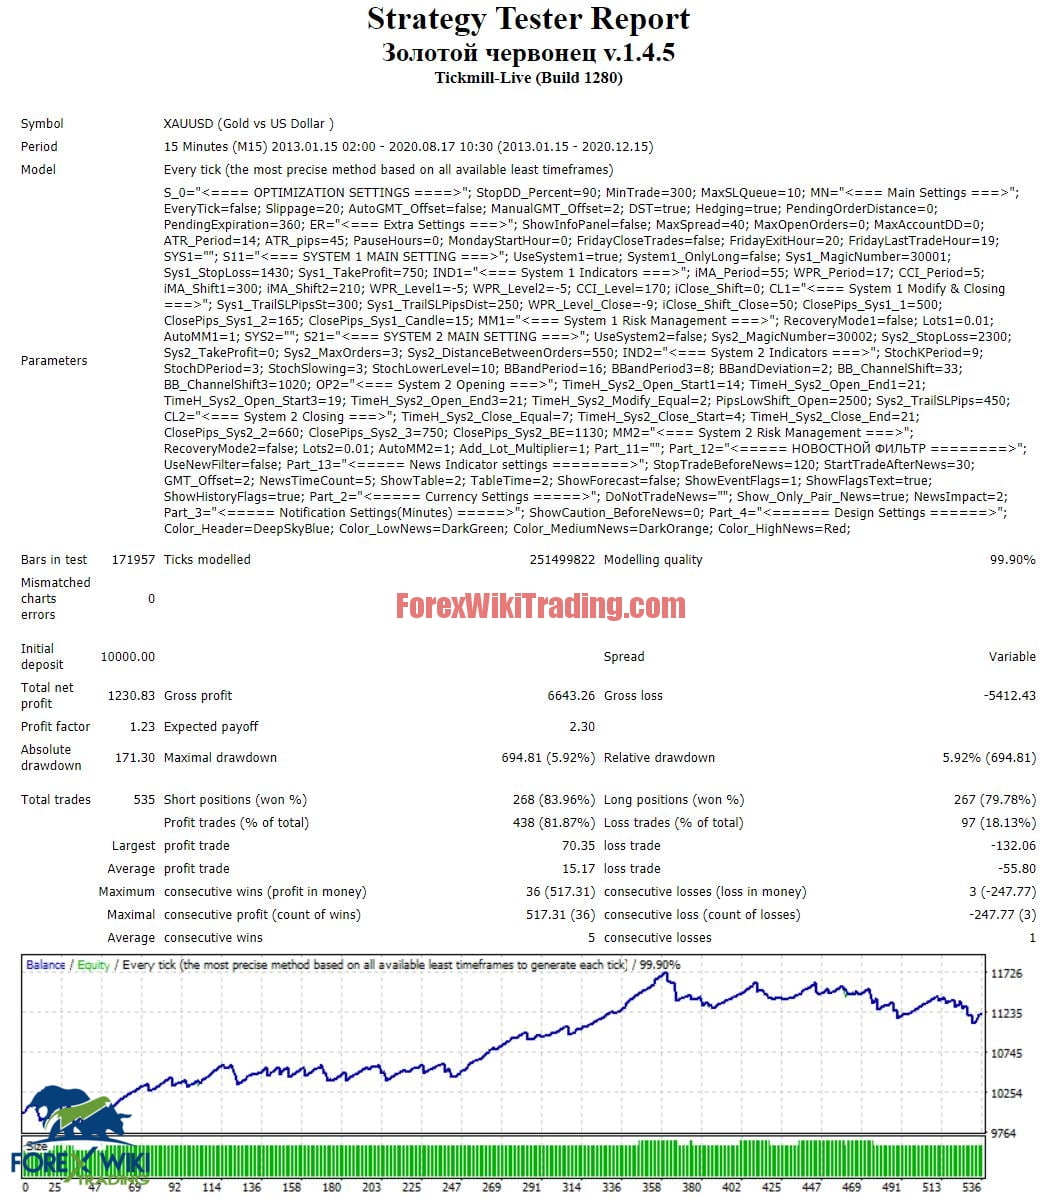
Now let's take a look at the strategy tests separately with Golden Spikes EA.
전략 1, 위험 1%, 2013-2020
80% of deals are profitable, but miracles do not happen - the average loss is clearly several times greater than the average profit.
In the second strategy, there are much fewer profitable trades - 오직 55%, but this is enough to bring the strategy to a plus.
In general, it can be seen that strategies complement each other well, compensating the periods of drawdowns for one strategy with income for another. 물론, not always, but often.
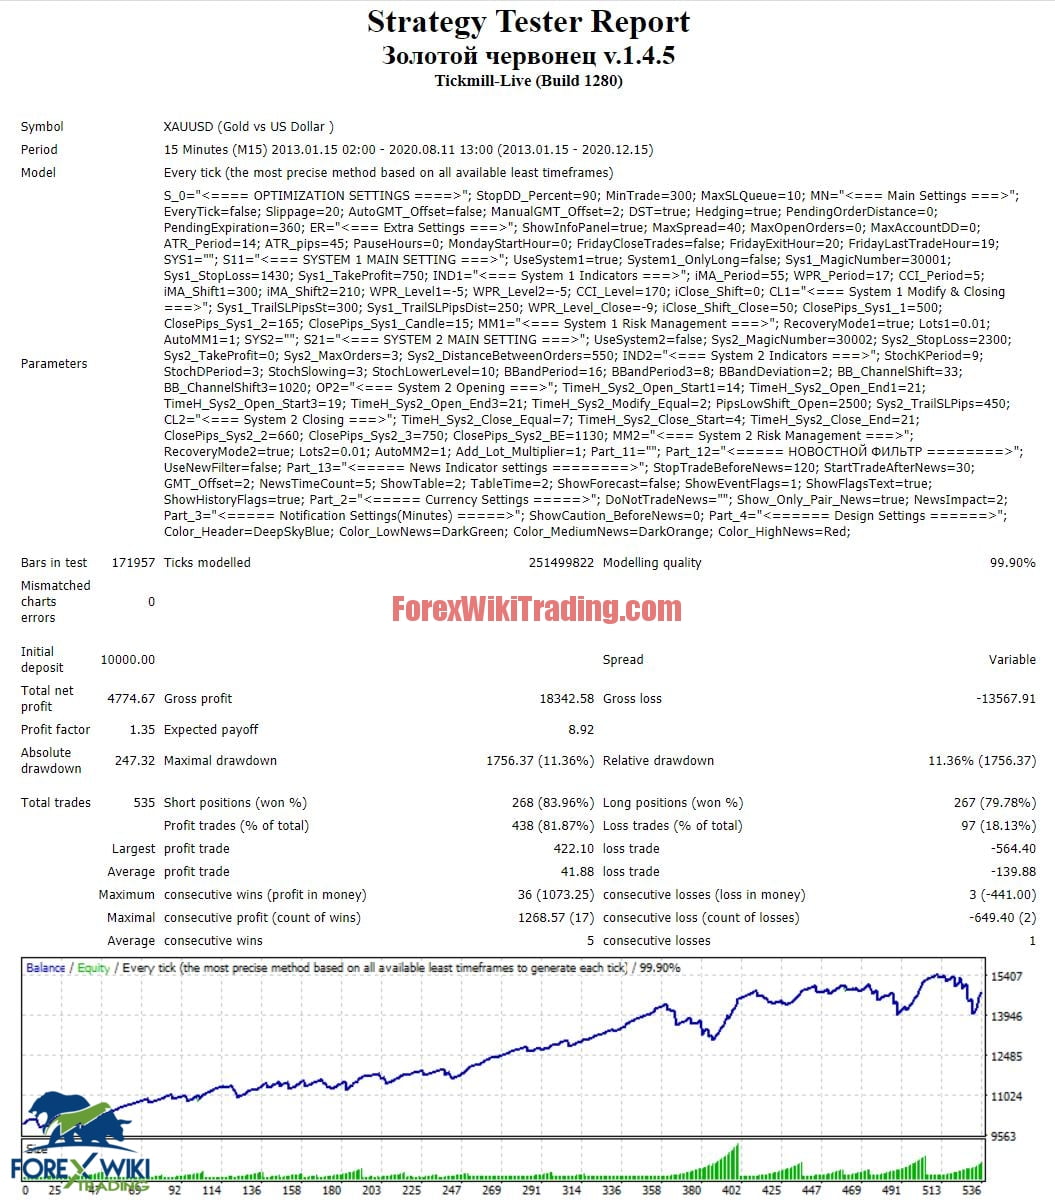
Tests with Recovery Mode Activated
1 전략
If in the first strategy the Recovery mode (increasing the lot after losing trades) can be used, 그 다음에 in the second strategy, Recovery should not be used...
Account monitoring
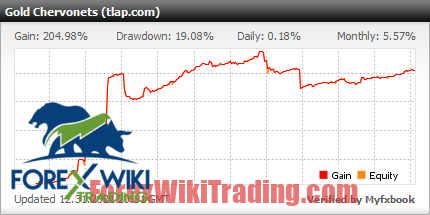
지금 이 순간, the advisor is showing excellent results due to the high volatility of gold. 그러므로, you should not think that it will always be so. You should be prepared for a drawdown and do not forget about risk management.
골든 스파이크 EA 다운로드:
골든 스파이크 EA


